Pre – production
To begin this project I had to create a pitch on a project that I would like to do. My pitch was about a battleship that destroys a village but this pitch was not chosen and I ended up working on a horror shot which was based in a school. Our project consisted of three shots the first being a pan down a hallway. The second is a matte painting with a green screen image in front of it. Than the third shot is a video of a zombie spazzing out and the footage corrupts and jump cuts.
Pre-Production was the first step to our project. At the beginning this took us a long time to get started on as the idea was changed. However we got our project kicked of by creating a gang chart. This allowed our group to spread out our work and set deadlines for when they need to be completed.

Another huge part to creating a VFX piece I needed concept art this allows you to base your work of an image instead of making it up on the top of your head, which can end up being a struggle. We created three concept arts. one piece in a locker room. One piece showing the out side of the school which later became our matt painting for the second shot. Than finally a piece in a classroom.


Next was the script, the script is the part which allows all the actors to say what they need to say and when. The script is very important and every film/ TV show will use them.

Crew list was next, this allowed our group to understand our roles. therefor allowing us to be m ore organised.

Concept Art
creating my concept art was actually very fun and I enjoyed it. Mine was based around and dark gloomy abounded school. I used images of abandoned schools from the internet. I than took them to Photoshop got ride of the background using the magic rubber tool. Using the blending options I used the gradient overlay to give the images a darker look. I changed the prospective of the images which allowed me to give the picture a sense of depth.
 I than placed grass down for the floor, this took a lot of editing to get the perspective to look correct. The images on the internet all had a close images of grass making it difficult to make it look like one whole image. To get round this I used the stamp tool to take pixels from one area of the image and apply them somewhere else.


Looking at the image the main part missing is the sky which makes the image. I got an image from the internet of a dark sky. The same as the buildings I changed the prospective to give it depth.

To add a more darker feel to the video a added in lightening. Lightening is the stereotypical weather for a spooky film. Adding in fog around the floor, I really liked adding this as it really made the image look spooky. I also began editing out the windows. Using the stamp just like the grass I took pixels from one place and applied them to another. I also added shadows casted from the lightining on the floor
After woulds i added a dark shadow to delpeat the light on the right side of the left building. I alaso fixed up any bad shadows. I than addeed a purple overlay glow to givew it a darker feel.

Creating the matt painting took time but it was enjoyable and i am happy with how it turned out as i believe it look realistic. When making it there wasn’t any hiccups. As it was really straight forward. the only challenge i really faced was trying line the two building up and creating a good looking link between them both. This challenge accord because both of the images where in two different settings. One was a dark one and the other was a light one therefor creating the challenge of linking them together and giving the viewer the believe that it is all one image. They way i did this was use the tools i was able to in Photoshop. These tools where brightness and contrast. This gave me the ability of of change the lighting of the building giving it a darker look therefor fitting it in with the background.
Now looking back the only thing i would change is how the grass looks. The building on the left looks as if it is tilting forward slightly, this makes the building look out of place and this is why i would like to change it. other than that i am happy with the outcome of my Matte painting.
The storyboard is probably the most important aspect of pre production as this is when the real development happens. Whatever is on the Storyboard is what normally ends up in the main video. Therefor who ever creates the storyboard therefor controls the final outcome of the editing.
Models
Chalk board
I created a chalk bored model which was easy when it came to models as it had a cube and stretched out the cube and narrow it down to create a thin screen I than went to the extrude tool and narrowed down the front face and than extruded it in slightly. than at the bottom of the bored I extruded it out to create a little shelf like at the beginning.
As essesseries for the chalk board i created chalk peices and a rubber. The chalk peices where made using cylinders and that was simply it. Than the rubber was created by using a cube and stretching it out to a cuboid and than extruding the bottom of the cuboid down and out. Uving for both of these models was easy as they where simple shapes with very little faces and edges. For the chalk i used a chalk texture and than for the rubber i used a fabric matiral texture for the bottom of the rubber and than used a wood texture for the handle. I wanted to add these peices in to add a more realistic look to my chalk board. The polyocount for all three models was very low which is good as the models look pretty good without being to complicated. Making it easier to UV them.

Now that the modelling was complete I moved to the uving this is by far in my opinion the worst part of modelling as I find it very difficult however it was simple but the only part which looked bad was the areas of the model which stretched out therefor making the texture look blurry.
Once I had taken I snapshot of the UV I took it into Photoshop and started adding all the textures to it I got an image of a chalk board Texture and placed this onto the centre of the board. Than I got a wood texture for the outline of the board.

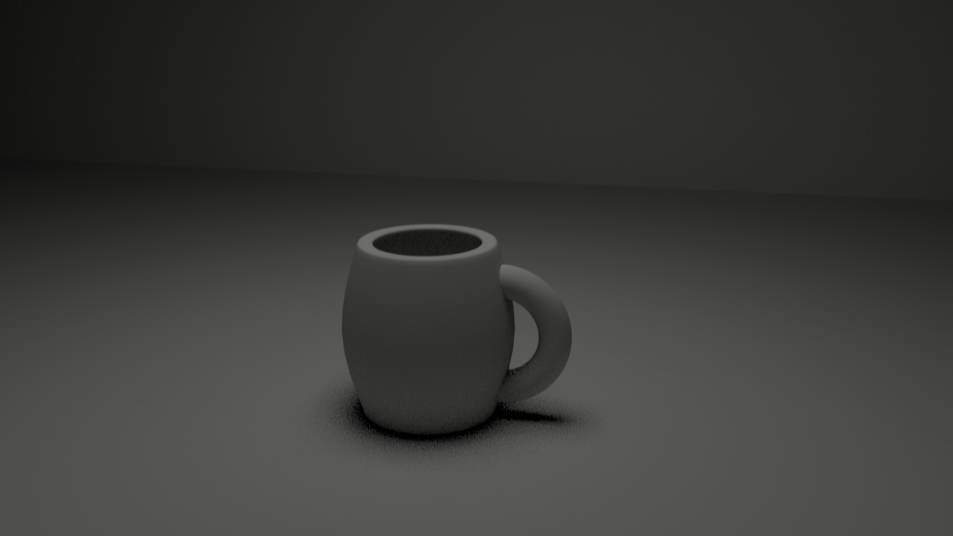
Than once i had than reloaded the UV onto the model i than rendered the model out using the Maya Hardware 2.0 because it is the best rednerer on maya giving the image the best look.

Mug
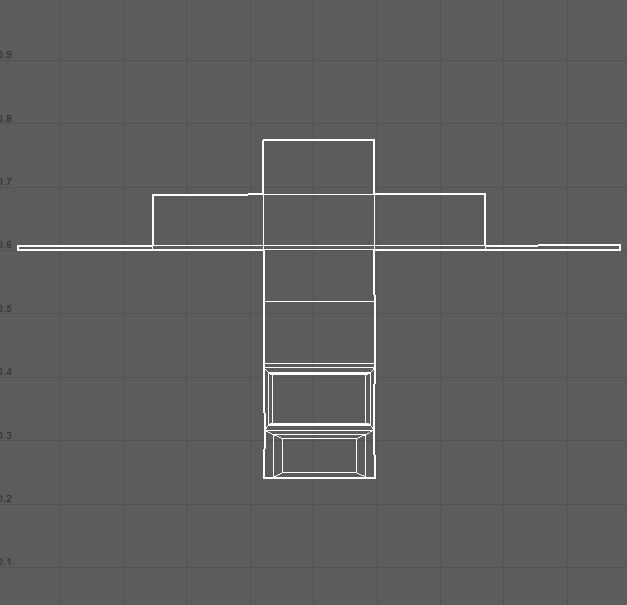
I moved onto the next model which was a mug. This was another simple model which was created by using a cylinder. I than highlighted all the top side faces and than proceeded to extrude them i than decreased the size of the complete face and than extruded it down to create a hole. I added edge loops to create the bump affect throughout the mug. i used edge loops to get get a sharp edge throughout the mug adding in detail.
The UV was simple as I added a china cup texture to it, I had to order the UV my self this is because it is easier and means there is no mistakes as the automatic option does not always work.

However, the polycount for the mug was very high, this is due to the fact that I used the curve tool to get the handle right because I couldn’t get it to bend and look normal before hand. A way I could have got round this was to put more time into the handle and make it out of a square.
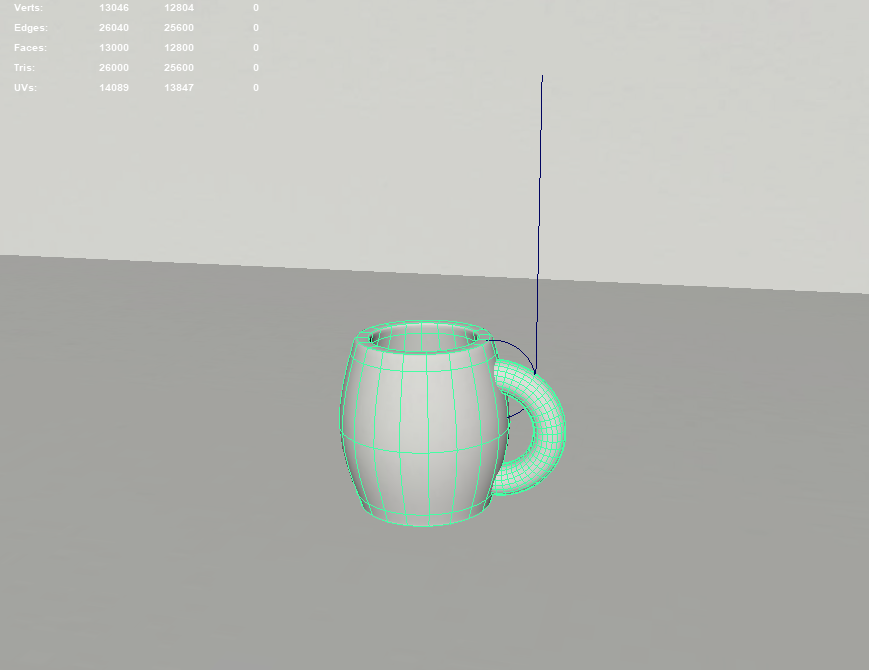
Below is the final model once I had rendered it using the Maya Hardware 2.0
Post Production
https://www.youtube.com/channel/UCI65cx_cTByfMkwNSfZMxxw
shot 3
Once pre production was completed I began on the editing. to change the darkness in the third shot that we filmed all that I needed to do was reduce the exposure this gave the shot a dark feel which added to the atmosphere of our project. I did this for the last shot first as the this was the shot which was started editing because it was the shot I believed would be the hardest shot. to my surprise I was the easiest. I than needed to put in the lightning effect this was done by simply increasing and decreasing the gamma and brightness by setting key points. We where gonna add in blood splatter but as a group we decided to not include it. Vince placed the models into the shot however he was meant to adds the sound but he did not. So I had to do it which was annoying because I knew no one else would so I just sat down and set off. I added in zombie noises, footsteps and bangs and crashes. Whilst adding in the sound I realist we need to mask out the models, which I had to learn. It took my ages and I had to mask every frame however once I had completed it was worth it.
Shot 2
The second shot was a matt painting which I had created in the pre pro section I did not the same to what I did in the first shot I added in lighting the same way I did in the third shot. Than to match the matte painting with the sky I had to add light effect to the top of the buildings. This was done by layering a mask in the shape of the roof and than doing the exact same to the roof to what I did with the third shot. This effect is simple but looks really good. I than passed the work onto Kirean as he was completing the keying. He than completed the keying, he than placed it into shot 2 which than completed the shot. The second shot is by far my favorite as it looks the best and i put allot of time into it. Once all the videos where put together i put in the thunder and sound by Vince. I than added in my own sound which was: Wind, Zombie moans, bones cracking and foot steps.

Shot one
The first shot was by far the hardest shot to complete. This was due to the fact I had to track the shot and nothing seemed to work at all. However I got there in the end using the 3D Camera Tracker.

The picture above shows all the tracking points that After Effects has placed. This than allows you to pick a place to put your picture on by hovering your mouse courser over the area you want the image to track to. A red target area will show up showing you the level of the area and whether it is flat or not. So moving the target around I looked for a flat area which eventually I found. Clicking on the area it will than highlight a area of three small dots. Right clicking on the area I than created a new Null. I than attached my null to the image I was using in this case it was a blood splatter that was created in Photoshop. However to get the image to correctly track onto the wall I had to do this process in this particular order or it would not work. Create null – load in image – attach image to null by using the little twirl circle on the right of the layer – make it into a 3D layer by ticking the box with the cube above it. The image should now be snapped to the null attaching it to the wall. To add realism and match the images to the background. I added blur and darkened them.
During the filming of the first shot we placed tracks to get the panning effect and this is how that shot looked:
Before filming this shot we all thought that we could simple remove the tracks by clean up. However when it actually came to it we realized it was to complicated and difficult to remove. Than after many attempts i began to look for a new idea, the idea i came up with was to use wire removal. This is the technique in which studios would use to remove a wire from a actor who is flying. Than ended up looking like a mess and it was just obvious something had been done to the floor. The next option was to track the shot and place a clean up picture over the top to create an illusion that the floor was normal however the problem which i faced during this was the track simply would not work. I tried many times and nothing worked leading me to have to change up my plan again. The only way i could edit the shot was to scrap it completely and re-shoot the shot. which created the road for the perfect shot.
Changes that where made
All the shots have now been edited the next part was to edit down all the videos and create a whole video therefor giving the finished product. the work was passed onto tom to complete this part.
Finally once the project had been completed there where a few changes made from what was expected during the pre production stage. The changes which where made was there was no blood added into the final shot. This was due to a group decision to not include it. Because we felt there was already a lot in the shot and didn’t want to flood it with loads of different subjects and make the shot look messy.
Final project
Did the group work well?
As a whole we got the work done which is a good start. However throughout the communication between each of my peers wasn’t the best. Creating the situation where no on knew what they where doing except for me as I basically became the leader. Even though I was telling my peers to do the work they did not until last minute. Which made me feel as if I was doing most f the work. Giving props to my peers though they did however get into gear and produce good pieces of work. I am no just critersing my team maybe my communication was poor and I didn’t get my point across even though I may have felt like I was.
However saying this we did has a dramatic change in group members around 3 months in where Oz are former member was swapped out with Vince. This off coarse set us back due to the fact we couldn’t claim Oz’s work and therefore had to redo 20% of the work. To get round this Whilst my peer where procrastinating, which with the internet at your disposal is very easy to do, I was slowly getting work done Creating the Matte painting, editing the shot 1 and 3. which had them completed waiting for others to do there part.
Even though i believe i did most of the work there i also area in which i could have improved. Such as i could have got a lot more work done in the time i had but distractions kept on getting in the way.
Evaluation
From the beginning of our project it wasn’t the most ambitious idea in the world therefor making it an easy task to accomplish. Our project would consist of three shots.
During Pre-production Thomas created concept art, Vince created a storyboard and Kieran created a health and safety list. Whereas I created the Matte painting, concept art, script, shot placements, Roles and models. From the pre-production I did a lot more simply because everyone wouldn’t do anything else. This did not change in post-production ether. Thomas Placed filtered over the footage that I edited Kieran keyed out the zombie for shot two and Vince took a month to place three audio files in one file to place in the shot. I however Edited shot 1, 2 and 3 in lightning, tracking and masking. I also added in sound effects to each shot.
As a whole we got the work done which is a good start. However, throughout the communication between each of my peers wasn’t the best. Which this is where I feel I lacked my communication. Creating the situation where no one knew what they were doing, however not a single person seemed to care. For two months straight Vince and tom where playing Forza Horizon 3 on the computer and every time I told them to stop they didn’t. I than started doing work early on so I could increase the quality of my work. I than started to become frustrated with my peers this was because my peers did not have the ambition to get the work done. As the deadline approached I would be dropped a continuous piece of extra work that no one would do. An example of this work was the mask of the zombie in the last shot which was dumped on me last minute due to Vince claiming they will do it and then refusing because they didn’t know how to. Due to the fact it as dropped on me last minute I couldn’t get the quality of work up and am really unhappy with this part as it looks terrible.
However, saying this we did has a dramatic change in group members around 3 months in where Oz are former member was swapped out with Vince. This off coarse set us back due to the fact we couldn’t claim Oz’s work and therefore had to redo 20% of the work. We did eventually catch up near the deadline because all group members began to take part which was great. There where however still parts where no one would on and I had to step in. Also the original idea was changed 3 months in as I suggested we change it to a horror story and everyone backed the idea.
From the beginning we as a group had an idea of how we wanted the work to go and how we wanted it to look. Know we have finished it I think the outcome is not how I wanted it to go. This is because I know it can be better if everyone put in a fair amount of work. It did come across that none of my team members actually cared about the project. Which is frustrated for me as I cared and wanted to produce the best work I could.
